August 6, 2025
The Complete Guide to Home Fermentation: From Kimchi to Kombucha
Your grandmother knew something modern kitchens have forgotten.
Long before refrigerators existed, families preserved food through fermentation—transforming simple vegetables into complex, probiotic-rich foods that could last months. Today, we're rediscovering this ancient wisdom, but with a modern twist that makes fermentation easier, safer, and more rewarding than ever. Whether you're craving authentic kimchi or want to brew your own kombucha, this guide will walk you through everything you need to create a thriving fermentation practice at home.
Why Fermentation Is Having Its Moment
Fermented foods are exploding in popularity for three compelling reasons:
The health benefits are undeniable. Fermented foods deliver live probiotics that support gut health, boost immunity, and may even improve mental clarity. Research shows that people who eat fermented foods regularly have more diverse gut microbiomes—a key indicator of overall health.
The flavor transformation is magical. Fermentation doesn't just preserve food; it creates entirely new taste experiences. Raw cabbage becomes tangy, complex kimchi. Plain tea transforms into effervescent, slightly sweet kombucha. The process literally creates flavors that don't exist in nature.
You gain complete control over what you eat. Store-bought fermented foods often contain preservatives, excess sugar, or artificial flavors. When you ferment at home, you know exactly what's in your food—and you can customize flavors to your family's preferences.
The Science Made Simple

Here's what actually happens during fermentation:
Beneficial bacteria (mainly lactobacilli) consume the natural sugars in your ingredients. As they feast, they produce lactic acid, which creates that signature tangy flavor and prevents harmful bacteria from growing. This process also breaks down proteins and carbohydrates, making nutrients more bioavailable to your body.
The key is creating the right environment. Good bacteria thrive in salty, oxygen-free conditions, while bad bacteria cannot survive. This is why salt is crucial in most fermentation recipes—it's not just for flavor, it's your food safety insurance.
Temperature matters more than you think. Most fermentations happen best between 65-75°F (18-24°C). Too cold, and fermentation crawls to a halt. Too hot, and you risk killing the beneficial bacteria or encouraging unwanted microorganisms.
Essential Equipment for Fermentation Success
You don't need expensive equipment to start fermenting. Here's what actually matters:
Must-Have Items
Glass jars with tight-fitting lids - Mason jars work perfectly. Avoid metal containers, which can react with the acidic environment and create off-flavors.
Kitchen scale - Fermentation is about ratios, not guesswork. A scale ensures consistent, safe results every time.
Non-metal mixing bowls and utensils - Wood, glass, or food-grade plastic only. Metal can interfere with fermentation.
Clean kitchen towels - You'll use these to cover fermenting vegetables and filter kombucha.
Nice-to-Have Upgrades
Fermentation weights - Keep vegetables submerged under their brine (though clean rocks or small glass jars work too).
Airlock lids - Allow gases to escape without letting air in. Not essential, but they reduce the need to "burp" your jars.
pH strips - Help ensure your ferments reach safe acidity levels (below 4.6 pH).
The total startup cost for basic fermentation equipment? Usually under $30.
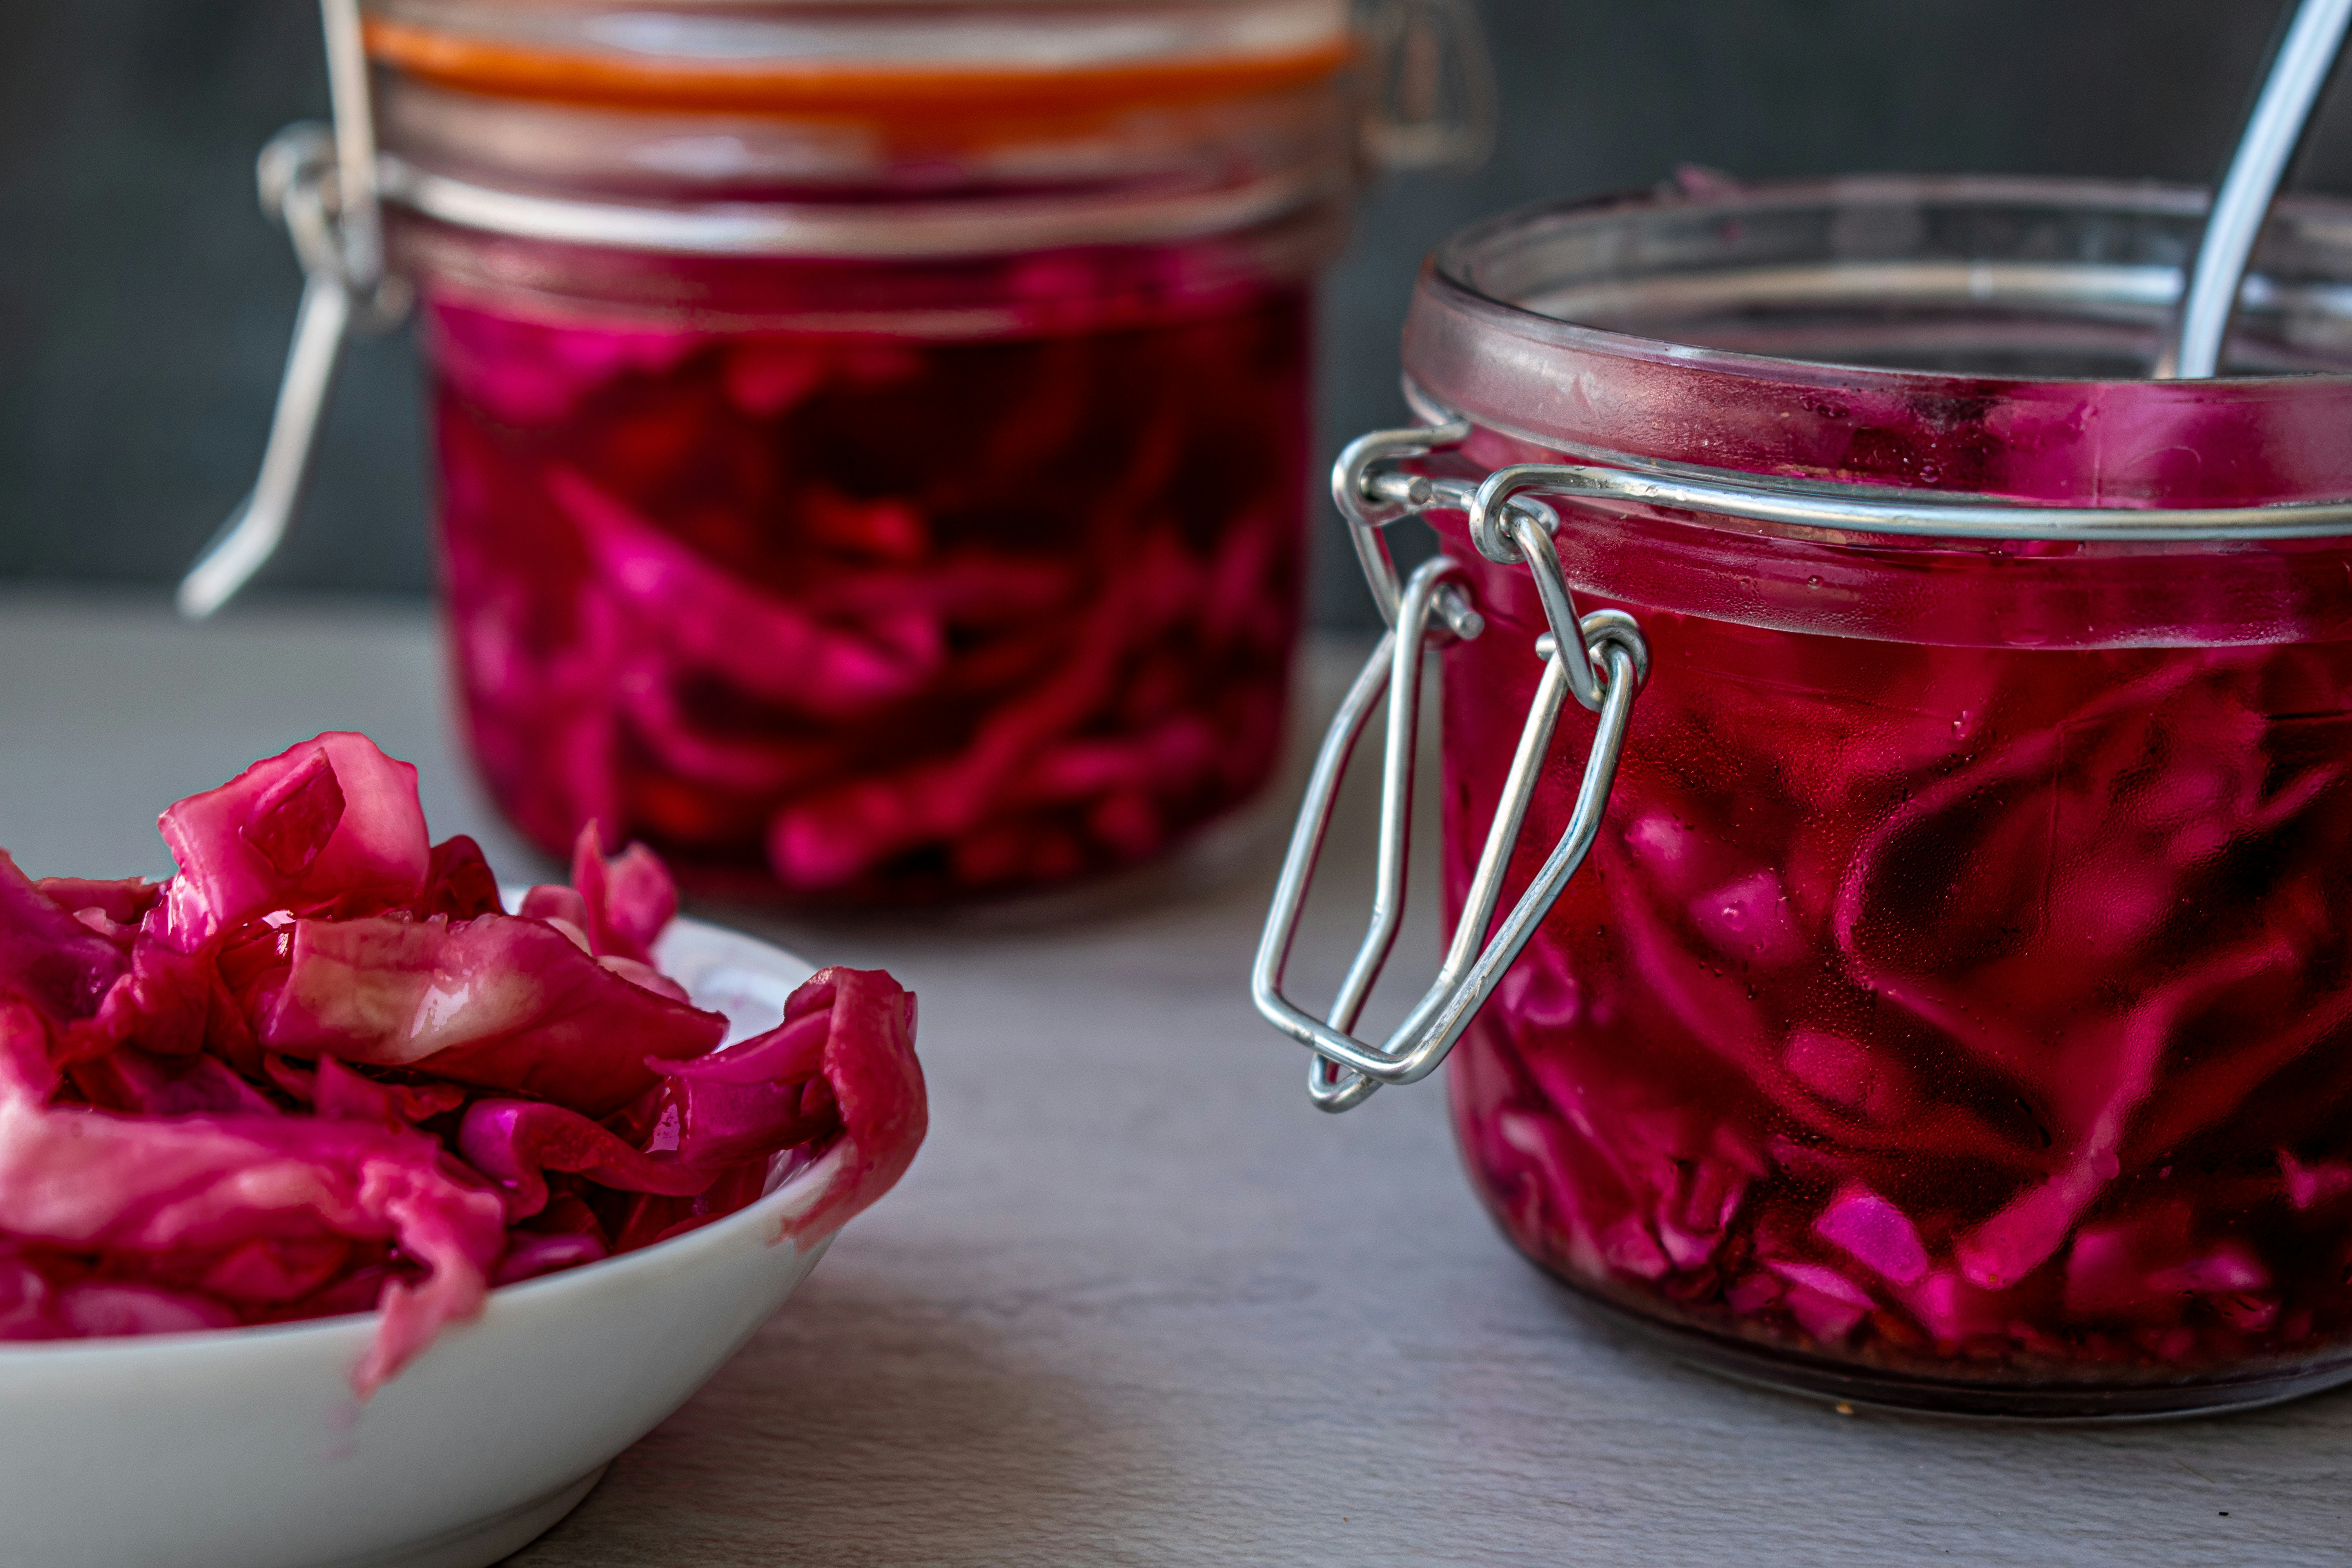
Mastering Kimchi: Your Gateway Fermentation Project

Kimchi is the perfect beginner fermentation because it's forgiving, fast, and incredibly rewarding.
Traditional Kimchi Recipe
Ingredients:
- 2 pounds napa cabbage, chopped
- 1/4 cup sea salt (for brining)
- 1 tablespoon grated ginger
- 5 cloves garlic, minced
- 1 teaspoon sugar
- 3 tablespoons fish sauce (or soy sauce for vegetarian)
- 1-5 tablespoons gochugaru (Korean chili flakes)
- 4 scallions, chopped
- 1 daikon radish, julienned (optional)
The Step-by-Step Process
Day 1: Create the brine Toss chopped cabbage with salt in a large bowl. Let it sit for 2-4 hours until the cabbage releases lots of water and becomes soft. This draws out moisture and creates the foundation for fermentation.
Make the paste Combine ginger, garlic, sugar, fish sauce, and gochugaru into a thick paste. Start with 1 tablespoon of gochugaru and add more for heat—you can always add, but you can't subtract.
Mix and pack Rinse the cabbage three times in cold water, then drain thoroughly. Mix with the paste and vegetables. Pack tightly into clean jars, pressing down until the liquid rises above the vegetables. Leave 1 inch of headspace.
Days 2-7: Watch the magic happen Keep jars at room temperature, pressing vegetables down daily to keep them submerged. Taste after 3 days—when it reaches your preferred sourness, move to the refrigerator. The fermentation slows dramatically in the cold but continues slowly for months.
Troubleshooting Common Kimchi Problems
White film on top? Usually kahm yeast—harmless but unappetizing. Skim it off and ensure vegetables stay submerged.
Too salty? Rinse the cabbage more thoroughly next time, or reduce the initial salt.
Not sour enough? Keep fermenting at room temperature, or check that your vegetables are submerged under liquid.
Mushy texture? Either over-salted initially or fermented too warm. Aim for 65-70°F for best texture.
Kombucha: Your Probiotic Powerhouse

Kombucha might seem intimidating, but it's surprisingly straightforward once you understand the basics.
What You Need to Get Started
A SCOBY (Symbiotic Culture of Bacteria and Yeast) - This weird, rubbery disc is alive and will ferment your tea. Get one from a friend, buy online, or grow your own from store-bought raw kombucha.
Strong, sweet tea - Black tea works best, though green tea and herbal blends can create interesting flavors.
Starter tea - Reserved kombucha from a previous batch. This acidifies your new batch and prevents contamination.
Basic Kombucha Recipe
First Fermentation (7-10 days):
Brew 8 cups of strong tea with 8 tea bags. Dissolve 1/2 cup sugar while hot, then cool completely. Add SCOBY and 1 cup starter tea to a glass jar. Cover with coffee filter or cloth, secure with rubber band. Ferment at room temperature for 7-10 days until it tastes slightly sweet and tangy.
Second Fermentation (2-4 days):
Reserve SCOBY and 2 cups of kombucha for your next batch. Bottle remaining kombucha with flavorings if desired. Seal tightly and ferment 2-4 days at room temperature for carbonation, then refrigerate.
Flavor Combinations That Work
Fruit-forward: Strawberry-basil, mango-ginger, blueberry-lavender
Savory-sweet: Rosemary-grapefruit, thyme-lemon, sage-apple
Spiced: Cinnamon-orange, cardamom-rose, turmeric-black pepper
Add 1-2 tablespoons of fruit juice, herbs, or spices per 16-ounce bottle during second fermentation.
SCOBY Care and Feeding
Your SCOBY is alive and needs attention. Feed it fresh sweet tea every 7-14 days, even if you're not making kombucha. Store extra SCOBYs in the refrigerator with some starter tea—they'll keep for months.
SCOBYs multiply with each batch. Share extras with friends or compost them. A healthy SCOBY should be cream-colored to light brown, firm but not hard, and smell mildly vinegary.
Warning signs: Black spots (mold—discard everything), strong alcohol smell (fermented too long), or fizzy starter tea (contamination).
Quick Wins: Easy Ferments for Beginners
Not ready for kimchi or kombucha? These simple projects build confidence and deliver delicious results in days.
Fermented Salsa (3-5 days)
Chop tomatoes, onions, peppers, and cilantro. Add 1 tablespoon salt per 2 cups vegetables. Pack in jar, keep submerged, ferment at room temperature until tangy. The fermentation mellows harsh onion flavors and adds complexity.
Curtido (Central American Sauerkraut) (5-7 days)
Shred cabbage, carrots, and onions. Add jalapeños, oregano, and salt (2% of vegetable weight). Pack tightly, ferment until sour. Perfect on tacos, eggs, or grilled meat.
Water Kefir (2-3 days)
Dissolve 1/4 cup sugar in 3 cups water. Add water kefir grains and a pinch of sea salt. Ferment 24-48 hours, strain, and enjoy. Add fruit juice for flavoring. Kefir grains multiply and last indefinitely with proper care.
Safety First: When Fermentation Goes Wrong
Fermentation is remarkably safe when done correctly, but you need to know the warning signs.
Red Flags to Watch For
Mold - Fuzzy growth in colors other than white. If you see black, blue, or green fuzz, discard everything and start over.
Off smells - Fermented foods should smell sour, earthy, or yeasty. Rotten egg, sulfur, or putrid odors indicate contamination.
Slimy texture - Some sliminess is normal in kimchi, but vegetables should still have structure. Mushy, disintegrating vegetables suggest problems.
Wrong pH - Finished ferments should be acidic (pH below 4.6). When in doubt, test with pH strips.
Golden Rules for Safe Fermentation
Cleanliness matters. Wash hands, sterilize equipment, and use clean utensils every time you check your ferments.
Salt is your friend. Don't reduce salt in recipes—it creates the environment good bacteria need to thrive while preventing harmful microorganisms.
Keep vegetables submerged. Exposure to air encourages mold growth. Press vegetables down daily and add brine if needed.
Trust your senses. If something looks, smells, or tastes wrong, don't risk it. Healthy ferments are obvious—they look vibrant, smell pleasant, and taste tangy but clean.
Advanced Techniques: Taking Your Skills Further
Once you've mastered the basics, these techniques will expand your fermentation repertoire.
Wild Fermentation
Instead of adding starter cultures, capture wild yeasts and bacteria from your environment. This works especially well with fruit ferments—the natural yeasts on grape skins, for example, will ferment grape juice into wine.
The risk: Wild fermentation is less predictable and has higher failure rates. The reward: Unique flavors that reflect your local environment and can't be replicated elsewhere.
Mixed Fermentation
Combine different fermentation methods for complex flavors. Ferment vegetables with added koji spores, or age kimchi in wine barrels. These hybrid approaches create unique products with layered flavors.
Seasonal Fermentation
Use seasonal produce at peak ripeness and availability. Spring garlic scapes, summer zucchini, fall apples, and winter root vegetables all ferment beautifully and connect you to natural rhythms.
Timing becomes crucial with seasonal projects. Miss the peak season, and you wait a full year for another chance.
The Biggest Challenge No One Talks About
Here's what fermentation guides don't tell you: timing is everything, and it's the hardest part to master.
You start a batch of kimchi with enthusiasm. Three days later, life gets busy. By day six, you remember to taste it—but now it's too sour. Or you forget about your kombucha SCOBY for three weeks, and it's developed a thick, leathery layer that changes the flavor profile.
Each fermentation project has a narrow window of perfect timing. Miss it, and you either get bland, under-fermented food or overly sour, mushy results.
Traditional fermentation masters developed intuition over decades. They could tell by smell, texture, and even sound when ferments reached peak flavor. But modern life doesn't give us that luxury of constant attention and decades of practice.
The solution isn't to abandon fermentation—it's to use modern tools to support ancient wisdom. Smart fermentation tracking can remind you when to taste, when to move items to cold storage, and when to start new batches for continuous supply.
Building Your Fermentation Practice
Successful fermentation isn't about perfect technique—it's about building sustainable habits.
Start Small and Scale Gradually
Begin with one type of ferment. Master kimchi before attempting miso. Perfect kombucha before trying jun or water kefir. Each fermentation teaches lessons that apply to others, but trying everything at once leads to overwhelm and mistakes.
Create Fermentation Rhythms
Weekly rhythms work best for most families. Sunday prep, Wednesday taste-testing, Saturday bottling. Regular schedules prevent forgotten batches and ensure continuous supply of fermented foods.
Track your timing. Note when you start each batch, what day you first taste it, and when you move it to cold storage. These patterns become your personal fermentation calendar.
Connect with Community
Join local fermentation clubs or online communities. Experienced fermenters love sharing knowledge, troubleshooting problems, and trading cultures. The fermentation community is remarkably generous and supportive.
Share your successes and failures. Both teach valuable lessons and help others on their fermentation journey.
Your Fermentation Journey Starts Now
The path from fermentation beginner to confident home fermenter isn't complicated, but it does require consistency and attention to timing.
Start with one project that excites you—whether that's Korean-inspired kimchi, homemade kombucha, or simple fermented salsa. Give it your full attention for the first few batches. Learn its rhythms, understand its timing, and develop confidence with the process.
The real magic happens when fermentation becomes part of your family's food culture. Kids who grow up tasting ferments at different stages develop sophisticated palates. Adults who track fermentation timing become more attuned to natural food rhythms. Families who ferment together create food traditions that last generations.
Your ancestors knew how to transform simple ingredients into complex, healthful foods that could sustain families through harsh seasons. You have that same capability, enhanced by modern understanding of food safety and nutrition.
The only question left is: which fermentation project will you start this week?
Want to master fermentation timing without the guesswork? Learn how smart tracking can help you never miss that perfect fermentation window again—because traditional wisdom deserves modern convenience.